What Does it Mean?
Maybe you just finished school and you are trying to figure out what to do for a career. An interest profile you took in your career guidance counselor’s office suggests you would work well in library and information studies. Or, maybe you’ve been in the workforce for a while and the career you’re in doesn’t excite you anymore. You were talking to the librarian at your local library and she was explaining the benefits of the position and the possibilities in the profession. The conversation really appealed to you and now you’re interested in librarianship. No matter the path, you found about this type of work and now you want to learn more about it. Let’s start with the basics: what does librarianship mean?
According to the dictionary, librarianship refers to an occupation whose primary focus is on acquiring and organizing collections of information, including books, periodicals, and related materials in libraries. Another primary focus of librarianship is to assist library patrons and users of library resources. Are you immediately thinking of your elementary school librarian? Sure – that person is included as a person in this profession. But, librarians don’t have to just work in the school system. In fact, librarianship encompasses work in a whole variety of settings you might not have thought of before. For example, librarians work in public libraries, museums, large corporations, law firms, non-profit organizations, government agencies, and healthcare institutions. And, of course, in educational settings (e.g., your school librarian).
What do Librarians Do?
Ok, now you know a little bit more about the librarianship profession. But, what do librarians do besides check out books? Actually, quite a bit! In fact, the American Library Association (ALA) has developed a whole set of core competencies that this profession requires. First, what is a core competency? Great question – core competencies are just worker requirements gathered from experience or education. Knowledges and skills that you’ve gathered through your work or your schooling. The American Library Association has recognized eight generalized core competencies for librarianship:
- Foundations of the profession – what it means to be in the librarianship profession and what is expected of you if you are in this profession. This includes specific certifications and other professional development you might need, depending on your specialty.
- Information resources – information about collections management and acquiring resources.
- Recorded knowledge and information organization – knowledges and skills need to categorize and organize information and library resources.
- Technological knowledge and skills – the application of various technologies in library science and information organization.
- Research – the fundamentals of conducting research in the library science field.
- Reference and user services – the knowledges and skills needed to help library patrons and other users with library resources – this includes consultation and needs analysis to retrieve data and information for individuals seeking assistance.
- Continuing education and lifelong learning – staying abreast of new technologies and new learning in the field of library science.
- Administration and management – human resource management and administration of resources in a library science environment.
Now that we know what key knowledges and skills are required in librarianship, what do the day-to-day activities of a librarian look like? Generally speaking, librarians are charged with servicing library patrons, listening to their needs, and assisting them to satisfy those needs. In general terms, if you walk in the library and ask the librarian how you go about finding information about crocheting, the librarian needs to understand if you want to find “how-to” information about crocheting, if you want to find pictures of crocheting patterns, or if you want to find a fiction book called “Crocheting.” Once the librarian finds out this information, s/he needs to have the knowledge of how that information in organized in the library, how to use resources to find out the specific cataloguing of that information, and then pointing you in the right direction of where to find that information off the shelf, on the computer, or in any other library resource.
Some other key tasks that librarians perform include searching reference materials, instructing library patrons on how to use reference materials and how to find cataloging information on computer systems, and teaching others on how to use library equipment.
The Way Things Used to Be
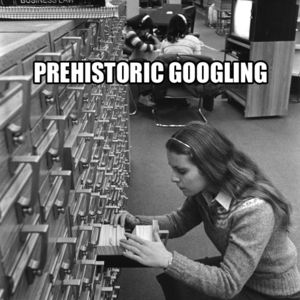 Librarianship has certainly come a long way. As has the world of work in general. Nowadays we are completely wired and technologically savvy – but, do you know how librarians used to work before computers? Before the computer age, every time a library acquired a book, the librarian would have to catalog it by hand. Have you ever heard about card catalogs? Not too long ago, when you went to the library to find a book, you had to use something called a card catalog to point you in the right direction of where to find it. And in these card catalogs, there were literally cards. Index cards filled with information about every book or resource in the library. The information that was placed on the card included the author of the book, the title of the book, when the book was published, and a synopsis of the subject of the book. Essentially, all of the information that you can find electronically today was written or typed on cards that were placed on the card catalog. And, this information system applied to not only books, but to movies, sound recordings, and other sources of data that needed to be processed and catalogued. These cards were then organized by subject through a classification system called the Dewey Decimal System. So, if you wanted to find information about thunderstorms – you would search on the subject of “weather.” This data was referred to in general as bibliographic records. In today’s world of librarianship, all of this data has been recorded electronically and these bibliographic records are what the library databases are built upon today.
Where Do Librarians Work?
As mentioned earlier, librarians work in libraries located throughout many different industries and occupational settings – law libraries, school libraries, museum libraries, and medical libraries to name a few. The most prevalent industries that librarians work in is educational settings, followed by local governments and colleges and universities. Most librarians in the United States have advanced degrees, such as a Master’s degree in Library Science. According to the Bureau of Labor Statistics, there are approximately 143,000 Librarians in the workforce and the median salary of Librarians across the United States is $56,880. The Department of Labor suggests that one in five librarians work part-time, though the overwhelming majority work full-time jobs.
Types of Librarians
I think we all think of our school librarians every time we think of a librarian. And while the Bureau of Labor Statistics does acknowledge that the majority of jobs are found in primary education settings, librarianship encompasses much more than the person who helped us find our favorite Dr. Seuss book as a child. Below is a list of some of the most common types of librarians:
- User Services Librarians – librarians focused on helping library patrons use library services to locate information; this includes teaching patrons on how to use electronic databases and other library resources.
- Technical Services Librarians – librarians who use technical services to gather and organize material for patrons; individuals in this job might also archive older information that is removed off of shelves.
- Administrative Services Librarians – librarians who serve an administrative role in running the library – including preparing budgets and maintaining human resources functions over employees working in the library system.
- Academic Librarians – librarians who mainly work within colleges and universities; a large part of these librariansí roles are to help students and faculty in the use of college libraries and college library databases.
- Public Librarians – librarians who work in public libraries and aid library patrons who visit these establishments; these individuals help the public in obtaining information for leisure or research.
- School Librarians – librarians who work within elementary, middle, and high schools and are sometimes referred to as school media specialists; these librarians help students utilize the library and also help teachers and staff in retrieving data resources for lectures and classroom discussion.
- Corporate Librarians – librarians who work within private establishments and are hired primarily to retrieve specialized information, such as insurance data.
- Government Librarians – librarians who assist government agencies in the retrieval of government information.
- Law Librarians – librarians specially trained in legal information retrieval; these individuals work directly with lawyers, law clerks, and law students to locate legal resources.
- Medical Librarians – librarians who assist doctors, nurses, or other health care professionals, including students, to find health and science information; these types of librarians may also work on clinical trials to retrieve information for health scientists.
What is Next for Librarianship?
There have already been major changes to librarianship over the years. Can we project what’s next for this profession? Well, we’re actually already looking in that direction. In 2013, the American Library Association formed a committee called the Center for the Future of Libraries. To specifically study just that: the trends and the future of librarianship. Like everything, it’s constantly evolving. And it’s our job to keep up. In the future of librarianship, we are likely to experience social, political, economic, and technological trends. And all of these things are likely to affect the landscape of librarianship. For example, people are moving away from print – what does that mean for libraries? Will we actually read physical books 50 years from now, or will everything be read on the computer? Will there be a need for librarians? As the digital age evolves, can’t a computer just point us in the right direction? These are all great questions and all things the profession of librarianship is looking at and adjusting as time marches forward. We already know how far we’ve come in the past 50 years of library science. Imagine what awaits us 50 years from today. Dewey who?